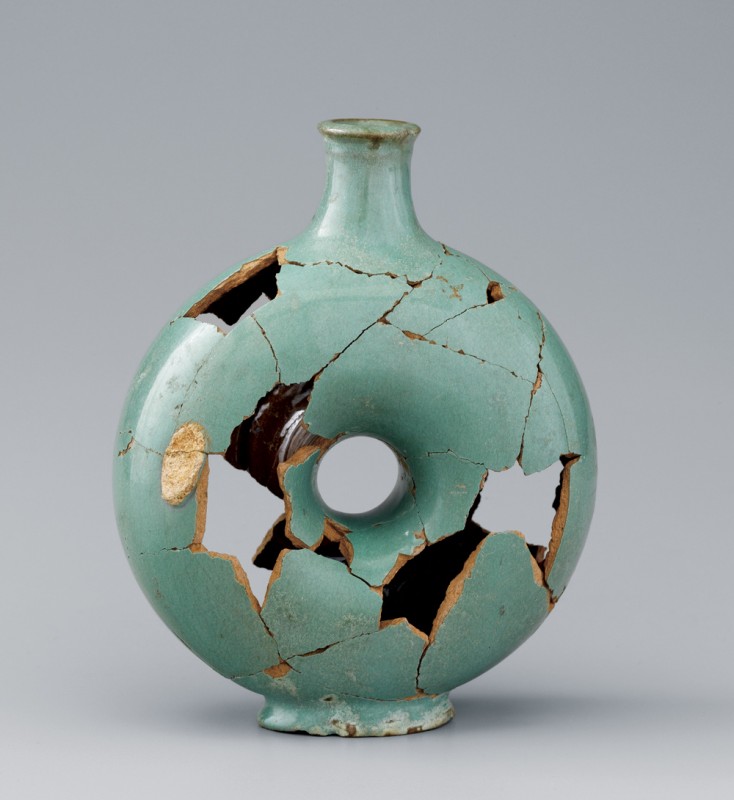
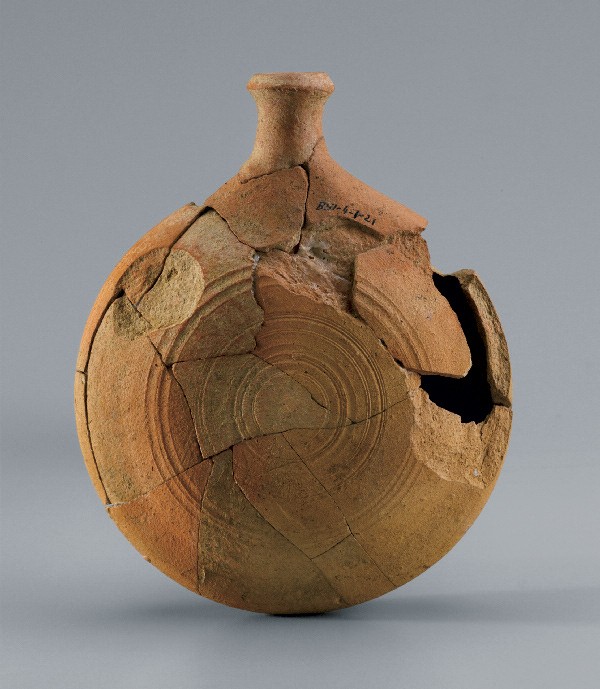
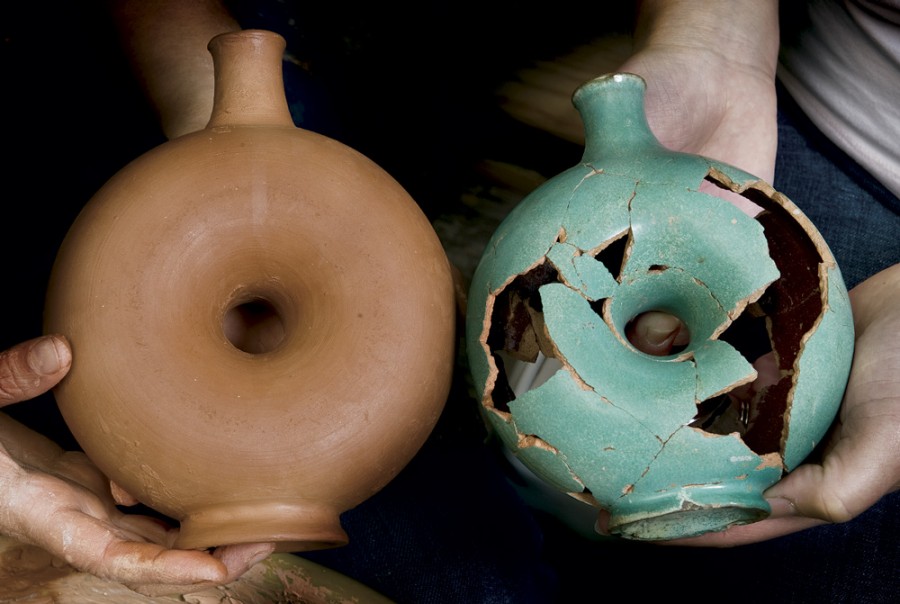
In 1793, Moravian administrator Frederic William Marshall reported that “a new kiln has been built for ‘faience’ [at the Salem pottery].”[1] Archaeological evidence for some of the products from this new kiln was recovered in the 1968 excavations by Stanley South on Lot 49 in Salem, North Carolina.[2] In the course of excavating a bricked drain on the site, excavators uncovered a treasure trove of bright turquoise-colored fragments representing at least six ring bottles or flasks—wasters from a kiln firing. Enough fragments were present to reconstruct a nearly complete example and to estimate the existence of at least five other vessels (figs. 1, 2). The fragments also provide direct evidence of the manufacturing and glazing process. A desire to understand the throwing skills necessary to produce these bottles forms the basis for this article.
The exterior of the ring bottle is covered in a greenish blue tin glaze, whereas the interior is glazed in a transparent lead glaze. The utilization of tin glaze is among the most significant discoveries regarding the use of this technique in an American context.[3] This sudden appearance of a traditional European glazing technology and the building of the new kiln coincide with the 1793 arrival of Carl Eisenberg in Salem.
Our knowledge of Eisenberg’s activities in Salem comes from research by Brad Rauschenberg—significantly, the discovery of Eisenberg’s recipe book, handwritten in German, which includes formulas for tin-glazing. The book’s title translates to “‘A Collection of Faience Glaze Recipes as well as All Sorts of Paint Colors and How They are to be Processed.’ Salem. October 26, 1793.”[4] Very little is known about Eisenberg’s life before he settled in Salem, but clearly he was an accomplished chemist. Rauschenberg suggests that he most likely emigrated from the Eisenberg region of Germany, an area noted for its eighteenth-century tin-glazed production.
The ring bottle form has its origins in antiquity and was a popular form in Germanic and Mediterranean cultures. Previous authors have attributed its production in Salem to Rudolph Christ, Salem’s master potter from 1789 to 1821, perhaps assuming that Eisenberg was responsible only for the glazing of the form.[5] We suggest that Eisenberg himself may be credited with the introduction of this form into the Moravian oeuvre. The manifestation of a skillful but expedient throwing technique, the making of ring bottles is a true potter’s art, in contrast to the model- and mold-making technique used in the Moravian shop for press-molded bottles.
The tin-glazed ring bottle can be differentiated from other Moravian bottles by the use of the glazing materials introduced by Eisenberg, as well as by the throwing techniques, possibly also introduced by him. The ingredients for tin-glazing are listed in the 1795 and 1796 inventories of the Salem potteries. Equally informative is the listing of 224 “Sack Bottles” in various sizes and at five different price levels. Rauschenberg suggests that these sack bottles are in fact the tin-glazed ring bottles reflected in the archaeological evidence from Lot 49. This assertion is supported by their glazed interiors—a feature not found on the decorative figural flasks.[6]
The round flask form (fig. 3) was known to the Moravian potters, as a bisque-fired example was excavated by South in Kiln Waster Dump 2 at the Bethabara pottery. South associated the materials recovered from this feature with the production of Gottfried Aust and his apprentices in the 1754–1771 period. Although also wheel thrown, the round flask differs significantly in the production techniques used to create it.
Its components include the thrown neck and two saucer-shaped disks that are joined. The neck is thrown separately and set aside to dry. The body is created by first throwing a saucer-shaped dish, which is allowed to dry slightly and is then removed from the wheel. A second saucer is thrown, and probably left on the wheel to dry. To create the hollow body of the flask, the potter places the two saucers together on the wheel and melds the edges. The air sealed inside prevents the form from collapsing onto itself. Following the evidence of exterior lines on the archaeological example, the body is trimmed to create the final form. After drying, a hole is cut into the body and the neck is added. The Aust circular flask did not have a foot, and the finished product might have been covered in cloth or leather for carrying purposes.
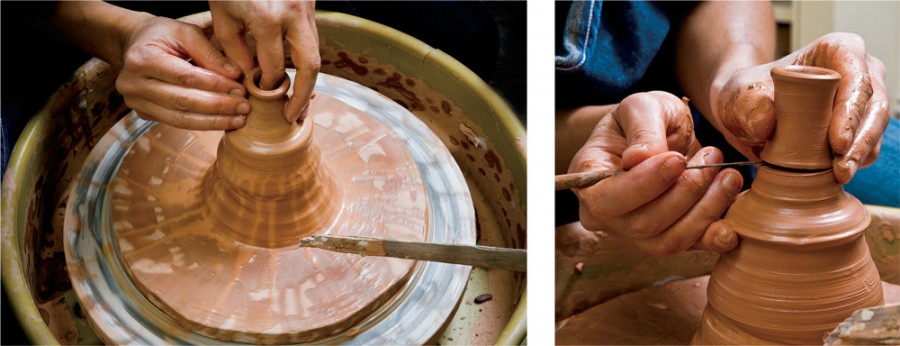
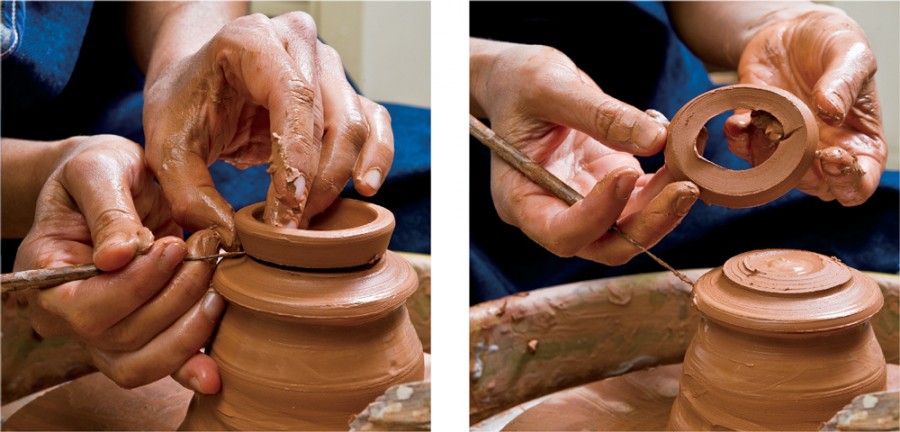
A competent skill level for the production of the Aust flask was necessary, but much greater throwing dexterity was required for the Eisenberg ring flask. The archaeological fragments are very helpful in providing clues as to the construction techniques used in creating the doughnut-shaped bottle (fig. 4). Through close examination, it is clear that the bottles were made from assembled components. Most potteries operated on the principle of a production line, making multiples in stages for efficiency. The spout of the ring bottles would have been thrown first, then set aside to dry to a leather-hard state (fig. 5). The pad foot, also created in multiples, was thrown as a circular ring, then cut in an oval shape corresponding to the width of the bottle’s body (figs. 6, 7).
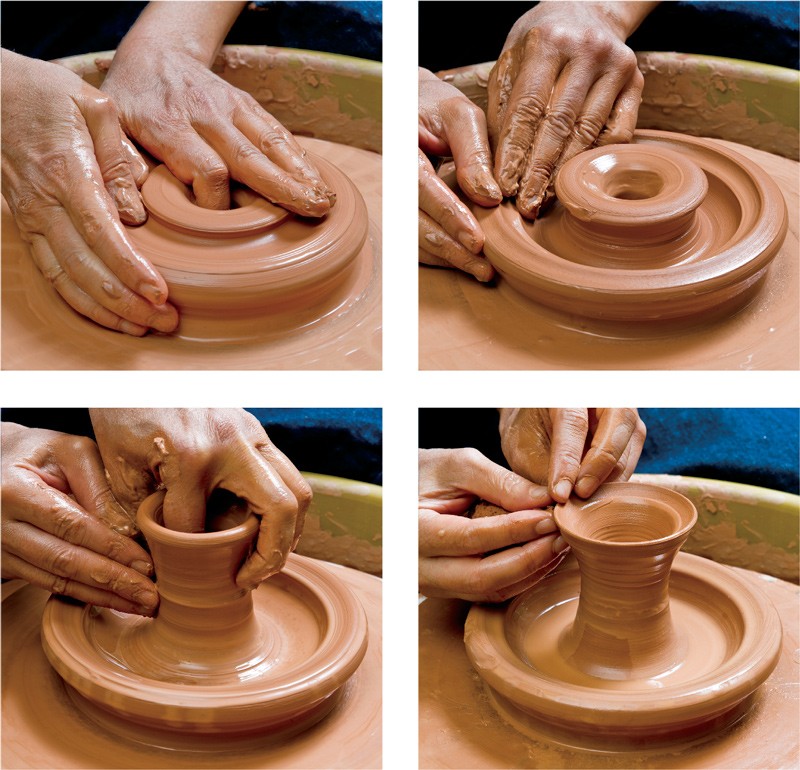
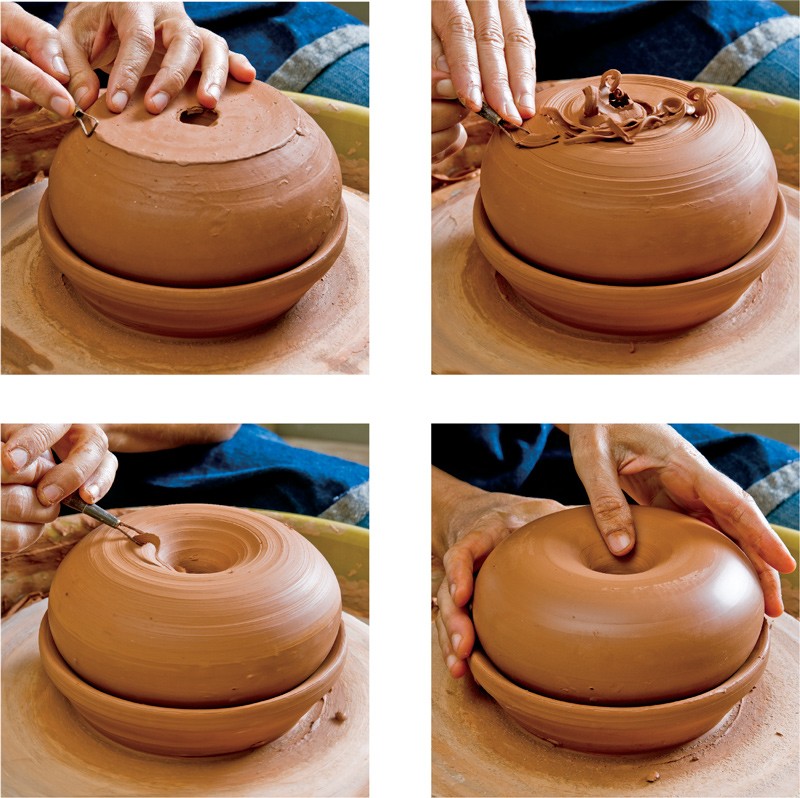
The body of the flask is made entirely on the wheel as a single component (fig. 8). An appropriately sized ball of clay is centered on the wheel and opened to create a vessel with an exterior wall and an interior one. The initial form has the appearance of a candlestick. The interior wall is raised first, creating the hollow center. The top lip of the interior is flared and curved in preparation for joining the exterior wall (fig. 9).
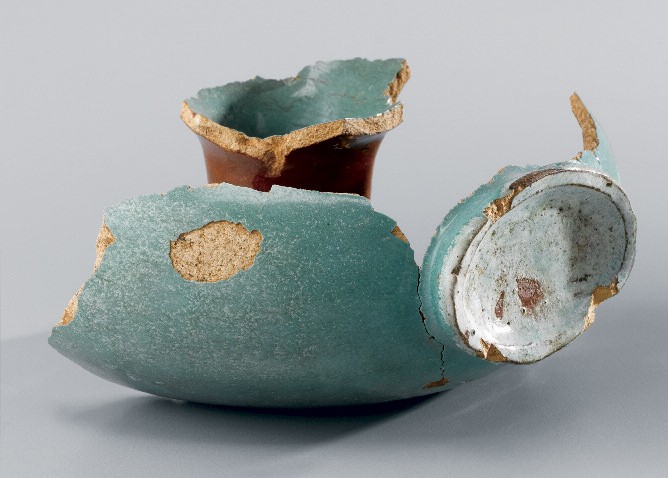
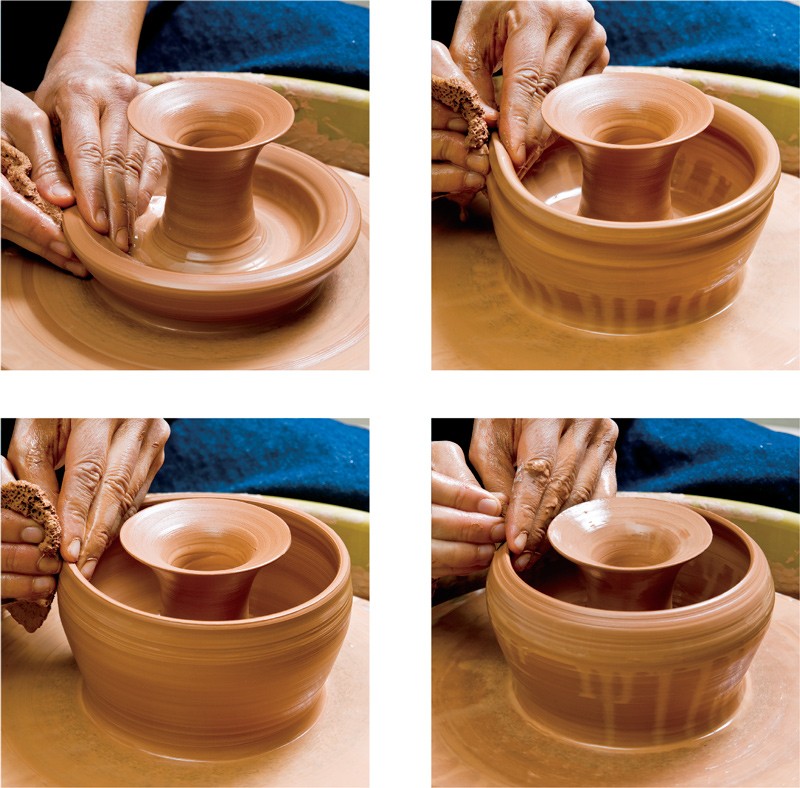
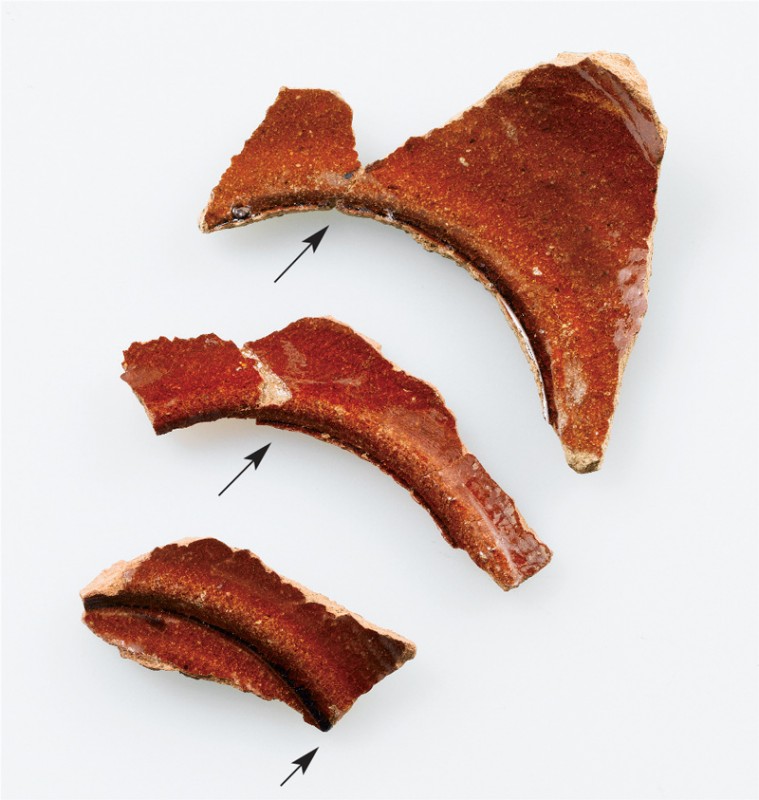
Next, the exterior wall is raised into a rounded shape and gradually pulled toward the interior cylinder. When contact between the lips of the interior and exterior walls is made, slight pressure is applied to meld the clay together, sealing the vessel (fig. 10). The trapped air helps the form retain its shape during this critical step. The seal, though strong, is the area most vulnerable to damage or separation, as demonstrated by the surviving bottle fragments (fig. 11).
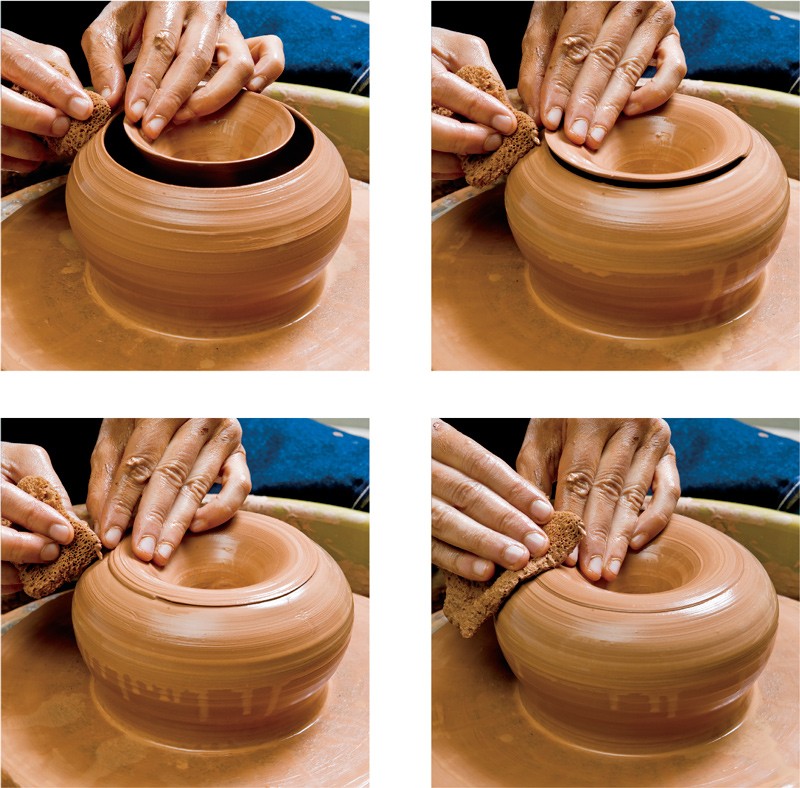
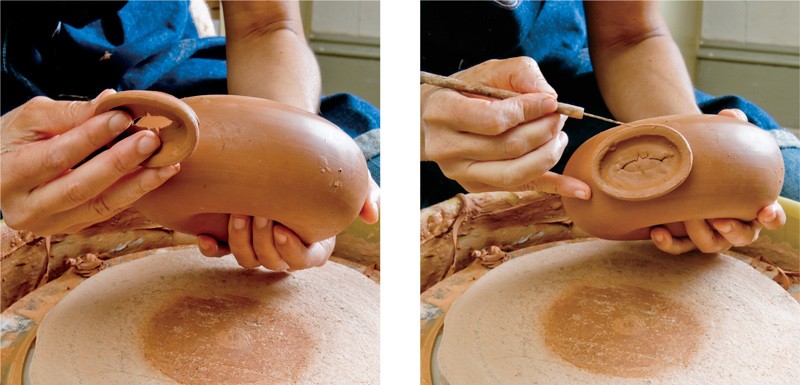
Once the seal is made, the upper contours of the body are finished while it remains on the wheel (fig. 12). The upper side is full and rounded, but the lower half of the body has to be thrown with enough depth and shape to trim to a fully round shape mirroring the thrown side. The body is then cut from the wheel and set aside to stiffen to a leather-hard state. The saucer ring is turned over and placed in a saucer to hold it firmly while the contours are created through trimming the surface. Final smoothing finishes the body (fig. 13).
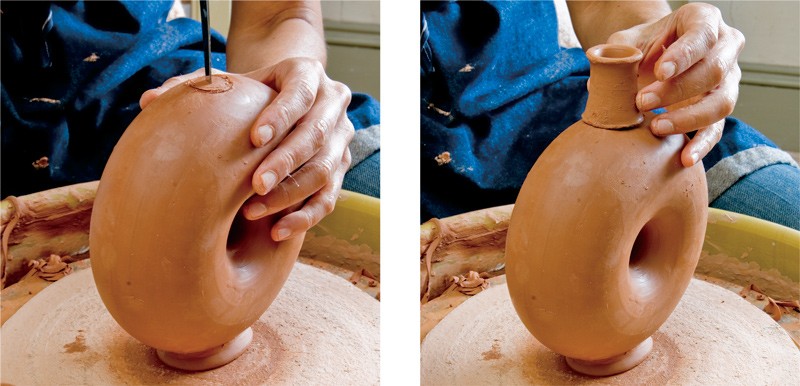
After the body is allowed to dry slightly, the assembling of the components begins. First the oval foot is attached to the body and the edges smoothed into the body (fig. 14). By attaching the foot first, the potter is able to align the position of the spout with precision. A circular hole is carefully cut into the body and the spout attached (fig. 15). Direct evidence of these attachment methods is supplied by original fragments (fig. 16).
After the assembly is completed, the bottle is allowed to dry completely before being bisque fired (fig. 17). On the original, a lead glaze was poured into the interior then poured out. The exterior was dipped into the tin-glaze mixture, mostly likely corresponding to Eisenberg’s “Sea Green” formula—12 lbs. lead ash with tin (prepared as an oxide), 2 1/2 lbs. Alicante carbonate of soda, 1 lb. potash, 7 lbs. white sand, 1 1/2 lbs. salt, 3 1/4 lbs. copper scale, 4 1/2 lbs. pipe clay, 1 1/4 lbs. coarse smalt, and 1 lb. silver litharge.[7]
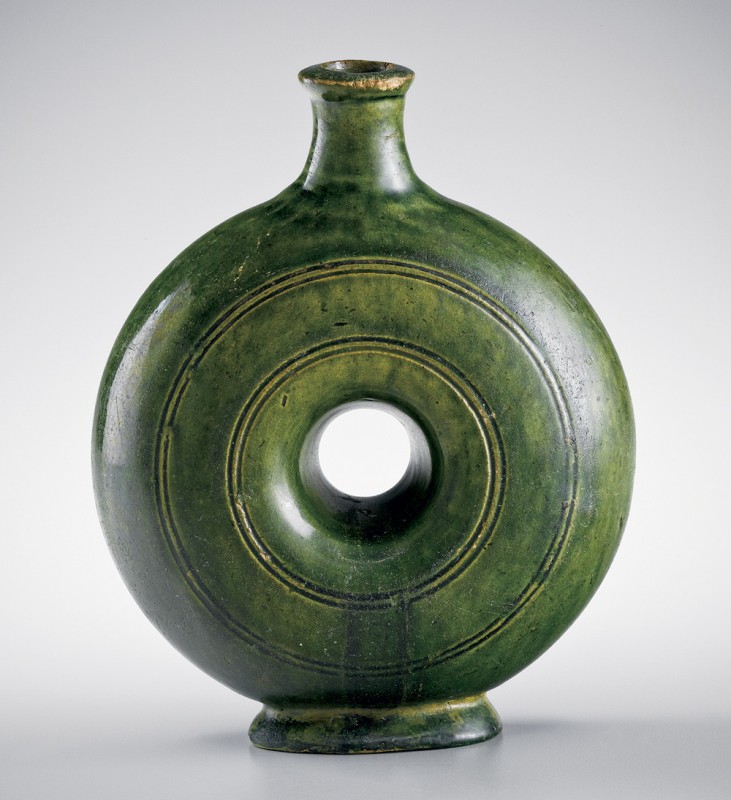
Beyond the important introduction of the tin-glazing chemistry into the Moravian potteries, the unique throwing skill necessary to create the ring bottle must be acknowledged. If Eisenberg was responsible for the introduction of the form as well as the tin glazes, the technique could have been readily taught to other Moravian potters. The handsome ring bottle shown in figure 18, covered in the familiar green glaze used in the production of the Moravian figural bottles, is perhaps the work of another Moravian potter. While the architecture is very similar, the finished bottle has two series of incised lines, a decorative touch not seen in the faience examples. Other than this green-glazed example, no other intact example has been found. This might suggest that the production of the ring bottle was short-lived; perhaps the bottle was not a successful product or was just too difficult to produce. Regardless of their success, they were an important innovation in North Carolina ceramic history and serve as reminders of the skills necessary in the art of making pottery.